2016年5月27日 星期五

在 CentOS7/RHEL7 上架設 Cacti 主機監控系統

設定目標:
  • 在 Centos 7 上安裝 Cacti 套件,監控主機狀態!
    • 請參考這一篇的設定,架設好 Web Server!
    • 請參考這一篇的設定,架設好 Mariadb Database Server!
快速設定流程:
  1. 利用 yum 安裝
    #yum -y install epel-release
    #yum -y update epel-release
    #yum -y upgrade
    #yum -y install httpd mariadb-server php php-mysql php-pear php-gd php-mbstring net-snmp net-snmp-utils rrdtool
    #yum -y install cacti
    
  2. 在 MariaDB 上,新增一組帳密/資料庫給 Cacti 使用:
    # mysql -u root -p
    MariaDB [(none)]> create database cacti;
    MariaDB [(none)]> grant all privileges on cacti.* to cacti@localhost identified by `你的密碼`;
    MariaDB [mysql]> exit;
    
  3. 匯入 cacti 資料表:
    #mysql -u cacti -p -A cacti < /usr/share/doc/cacti-0.8.8h/cacti.sql
    (沒錯誤訊息,表示正確!)
    
  4. 設定 Web Site 相關設定參數:
    #vim /etc/httpd/conf.d/cacti.conf
    Alias /cacti    /usr/share/cacti
    
    <Directory /usr/share/cacti/>
            <IfModule mod_authz_core.c>
                    # httpd 2.4
                    Require host localhost
                    Require all granted
            </IfModule>
            .........
    </Directory>
    
    
  5. 修改 Cacti 網頁設定檔:
    #vim /etc/cacti/db.php
    .........
    $database_username = "cacti";
    $database_password = "你的密碼";
    .........
    
  6. 修改 PHP 設定檔:
    #vim /etc/php.ini
    .........
    date.timezone = Asia/Taipei
    .........
    
  7. 修改 Crontab 設定檔:
    #vim /etc/cron.d/cacti
    (取消註解)
    */5 * * * *     cacti   /usr/bin/php /usr/share/cacti/poller.php > /dev/null 2>&1
    
  8. 啟動 Web 以及 Snmp 服務:
    #systemctl enable httpd
    #systemctl start httpd
    #systemctl enable snmpd
    #systemctl start snmpd
    
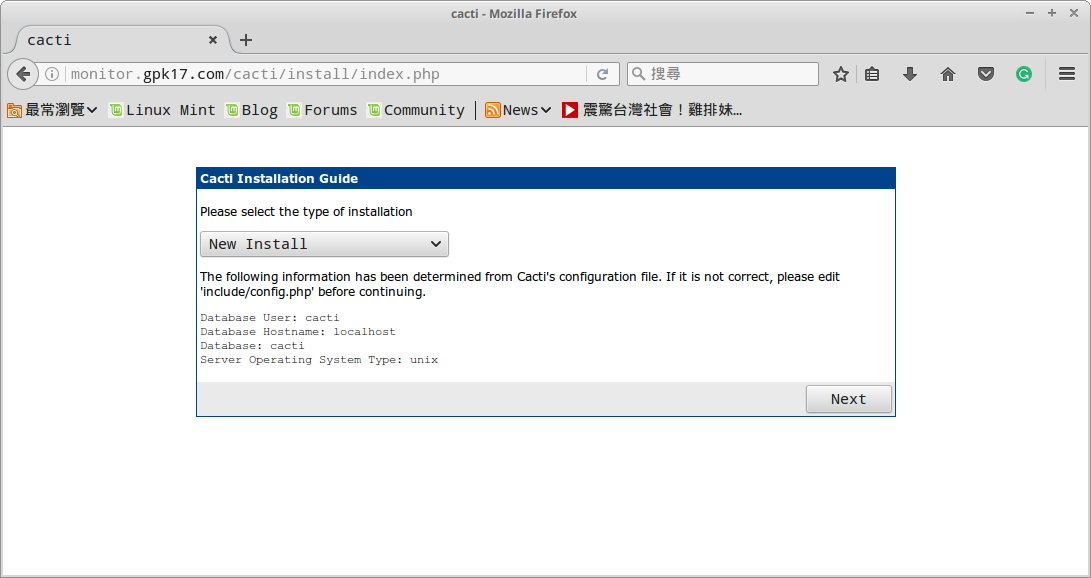
  9. 利用 firefox ,連線 cacti 網頁:
    #firefox http://localhost/cacti
    
    出現第一次登入頁面!

  10. 設定資料庫資料!

  11. 修正錯誤的地方,完成 cacti 設定:

  12. Cacti 登入畫面:

  13. PS:預設帳密 admin/admin
  14. 登入後,立即被要求改密碼:

  15. Very 寫意的畫面:

參考文獻:


  1. http://www.server-world.info/en/note?os=CentOS_7&p=cacti&f=1

在 CentOS7/RHEL7 上架設多個 PHP 版本的 Web Server

設定目標:
  • 在 Centos 7 上安裝多個 php 版本的 Web Server!
  • Web Server 可以是 Apache 套件,也可以是 Nginx 套件!
    • 請參考這一篇的設定,架設好 Web Server!
快速設定流程:
  1. 利用 yum 安裝
    #yum install 
    

參考文獻:

  1. http://serverfault.com/questions/671400/multiple-versions-of-php-through-nginx
  2. http://www.server-world.info/en/note?os=CentOS_7&p=nginx&f=9
  3. https://www.digitalocean.com/community/tutorials/how-to-host-multiple-websites-securely-with-nginx-and-php-fpm-on-ubuntu-14-04
  4. https://serversforhackers.com/video/php-fpm-multiple-resource-pools
  5. https://www.howtoforge.com/how-to-use-multiple-php-versions-php-fpm-and-fastcgi-with-ispconfig-3-ubuntu-12.10
  6. https://www.howtoforge.com/perfect-server-centos-7-x86_64-nginx-dovecot-ispconfig-3

2016年5月23日 星期一

在 CentOS7/RHEL7 上使用 PgAdmin III

設定目標:
  • 利用 PgAdmin III 管理 PostgreSQL Server!
    • 請參考這一篇的設定,架設好 PostgreSQL Server!
快速設定流程:
  1. 利用 yum 安裝 PgAdmin III:
    #yum install epel-release
    #yum install pgadmin3
    
  2. 利用 yum 安裝 PgAdmin III:
    #vim /var/lib/pgsql/data/pg_hba.conf
    (追加下列設定)
    host    all     all     192.168.5.244/32    md5
    
  3. 重新啟動 PostgreSQL Server:
    #su - postgres
    $pg_ctl restart
    
  4. 登入 X Window ,啟動 pgadmin3 :
    #pgadmin3 &
    
  5. 按下「插座」圖示,輸入相關 PostgreSQL Server 資訊、帳密,即可登入!

2016年5月22日 星期日

在 CentOS7/RHEL7 上架設多部 PostgreSQL

設定目標:
  • 架設多部 PostgreSQL Server,並且設定 Replication 進行同步資料與備援!
事前說明與準備:
  • PostgreSQL 基本安裝,請參考這一篇的設定!
  • 本篇將架設 9.4 版多部 PostgreSQL Server!一部 Pgpool-II,一部 Master Server 以及一部 Standby Server!
  • 示意圖如下:
    pgpool server: 192.168.100.241 pgs1 server: 192.168.100.231 pgs2 server: 192.168.100.232
  • 本篇將利用 repmgr 與 pgpool-II 來進行實作!

(一)安裝前設定流程:
  1. 先製作 ssh 金鑰對,方便連線登入到各個 Server:
    [root@pgpool ~]#ssh-keygen -t rsa
    [root@pgs1 ~]# ssh-keygen -t rsa
    [root@pgs2 ~]# ssh-keygen -t rsa
    
  2. 將製作好的 ssh 公鑰,互相送到各個 Server:
    (pgpool Server 上的設定)
    [root@pgpool ~]# ssh-copy-id -i /root/.ssh/id_rsa.pub root@pgs1
    [root@pgpool ~]# ssh-copy-id -i /root/.ssh/id_rsa.pub root@pgs2
    
    (pgs1 Server 上的設定)
    [root@pgs1 ~]# ssh-copy-id -i /root/.ssh/id_rsa.pub root@pgpool
    [root@pgs1 ~]# ssh-copy-id -i /root/.ssh/id_rsa.pub root@pgs2
    
    (pgs2 Server 上的設定)
    [root@pgs2 ~]# ssh-copy-id -i /root/.ssh/id_rsa.pub root@pgpool
    [root@pgs2 ~]# ssh-copy-id -i /root/.ssh/id_rsa.pub root@pgs1
    
  3. 在各個 Server 上安裝 PostgreSQL 的 repo 檔案:
    [root@pgpool ~]#yum -y install http://yum.postgresql.org/9.4/redhat/rhel-7-x86_64/pgdg-centos94-9.4-1.noarch.rpm
    [root@pgs1 ~]# yum -y install http://yum.postgresql.org/9.4/redhat/rhel-7-x86_64/pgdg-centos94-9.4-1.noarch.rpm
    [root@pgs2 ~]# yum -y install http://yum.postgresql.org/9.4/redhat/rhel-7-x86_64/pgdg-centos94-9.4-1.noarch.rpm
    
    ※上述網址為 PostgreSQL 官方提供的網址!

  4. 提前先新增 postgres 使用者與群組,以利後續的操作:
    (製作 pgpool Server上的 postgres 使用者與群組)
    [root@pgpool ~]# mkdir /var/lib/pgsql
    [root@pgpool ~]# groupadd -r -g 26 postgres
    [root@pgpool ~]# useradd -r -u 26 -M -d /var/lib/pgsql -n -g postgres postgres
    [root@pgpool ~]# passwd postgres
    [root@pgpool ~]# chown postgres:postgres -R /var/lib/pgsql/
    
    (製作 pgs1 Server上的 postgres 使用者與群組)
    [root@pgs1 ~]# mkdir /var/lib/pgsql
    [root@pgs1 ~]# groupadd -r -g 26 postgres
    [root@pgs1 ~]# useradd -r -u 26 -M -d /var/lib/pgsql -n -g postgres postgres
    [root@pgs1 ~]# passwd postgres
    [root@pgs1 ~]# chown postgres:postgres -R /var/lib/pgsql/
    
    (製作 pgs2 Server上的 postgres 使用者與群組)
    [root@pgs2 ~]# mkdir /var/lib/pgsql
    [root@pgs2 ~]# groupadd -r -g 26 postgres
    [root@pgs2 ~]# useradd -r -u 26 -M -d /var/lib/pgsql -n -g postgres postgres
    [root@pgs2 ~]# passwd postgres
    [root@pgs2 ~]# chown postgres:postgres -R /var/lib/pgsql/
    
    
  5. 仿照 root 製作 ssh 公鑰對方式,互相送到各個 Server,以利將來登入設定:
    (製作 pgpool 上的 postgres 憑證,並送至其他 Server)
    [root@pgpool ~]# su - postgres
    -bash-4.2$ ssh-keygen -t rsa
    -bash-4.2$ ssh-copy-id -i .ssh/id_rsa.pub postgres@pgs1
    -bash-4.2$ ssh-copy-id -i .ssh/id_rsa.pub postgres@pgs2
    
    (製作 pgs1 上的 postgres 憑證,並送至其他 Server)
    [root@pgs1 ~]# su - postgres
    -bash-4.2$ ssh-keygen -t rsa
    -bash-4.2$ ssh-copy-id -i .ssh/id_rsa.pub postgres@pgpool
    -bash-4.2$ ssh-copy-id -i .ssh/id_rsa.pub postgres@pgs2
    
    (製作 pgs2 上的 postgres 憑證,並送至其他 Server)
    [root@pgs2 ~]# su - postgres
    -bash-4.2$ ssh-keygen -t rsa
    -bash-4.2$ ssh-copy-id -i .ssh/id_rsa.pub postgres@pgs1
    -bash-4.2$ ssh-copy-id -i .ssh/id_rsa.pub postgres@pgpool
    
  6. 注意 SELinux 的修正:
    [root@pgpool ~]# /sbin/restorecon -vR /var/lib/pgsql/
    [root@pgs1 ~]# /sbin/restorecon -vR /var/lib/pgsql/
    [root@pgs2 ~]# /sbin/restorecon -vR /var/lib/pgsql/
    

(二)在 Master 上安裝設定 PostgreSQL Server:
※Master Server 為本例的 pgs1 Server!
  1. 利用 YUM 安裝必要套件:
    #yum -y install postgresql94 postgresql94-server postgresql94-contrib rsync
    
  2. 安裝 repmgr 套件:
    #yum -y install http://yum.postgresql.org/9.4/redhat/rhel-7-x86_64/repmgr94-3.1.2-1.rhel7.x86_64.rpm
    
    ※ repmgr 套件是用來監控 PostgreSQL Server 對其他 PostgreSQL Server 的 Replication 動作!
  3. 初始化 PostgreSQL Database:
    #/usr/pgsql-9.4/bin/postgresql94-setup initdb
    
  4. 編輯 PostgreSQL 連線設定檔:
    #vim /var/lib/pgsql/9.4/data/pg_hba.conf
    (只修改需要修改的部份)
    local   all             all                             trust
    host    all             all         127.0.0.1/32        md5
    host    all             all         ::1/128             md5
    host    repmgr          repmgr      192.168.100.231/32  trust
    host    replication     repmgr      192.168.100.231/32  trust
    host    repmgr          repmgr      192.168.100.232/32  trust
    host    replication     repmgr      192.168.100.232/32  trust
    host    all             pgpool      192.168.100.241/32  trust
    host    all             all         192.168.100.241/32  md5
    
  5. 編輯 PostgreSQL 設定檔:
    #vim /var/lib/pgsql/9.4/data/postgresql.conf
    (只修改需要用到的部份)
    listen_addresses = '*'
    max_connections = 200
    shared_buffers = 512MB
    effective_cache_size = 1536MB
    work_mem = 2621kB
    maintenance_work_mem = 128MB
    default_statistics_target = 100
    shared_preload_libraries = 'repmgr_funcs'
    wal_level = hot_standby
    wal_buffers = 16MB
    checkpoint_segments = 32
    checkpoint_completion_target = 0.7
    archive_mode = on
    archive_command = 'cd .'
    max_wal_senders = 1
    wal_keep_segments = 5000
    wal_sender_timeout = 1s
    hot_standby = on
    log_destination = 'stderr'
    logging_collector = on
    log_directory = 'pg_log' 
    log_filename = 'postgresql-%a.log' 
    log_truncate_on_rotation = on
    log_rotation_age = 1d
    log_rotation_size = 0
    log_min_duration_statement = 0
    log_checkpoints = on
    log_connections = on
    log_disconnections = on
    log_line_prefix = '%t [%p]: [%l-1] user=%u,db=%d '
    log_lock_waits = on
    log_statement = 'all'
    log_temp_files = 0
    datestyle = 'iso, mdy'
    timezone = 'Europe/Brussels'
    lc_messages = 'en_US.UTF-8'
    lc_monetary = 'en_US.UTF-8'
    lc_numeric = 'en_US.UTF-8'
    lc_time = 'en_US.UTF-8'
    default_text_search_config = 'pg_catalog.english'
    
  6. 建立 repmgr 專用目錄:
    #su - postgres
    $ mkdir -p /var/lib/pgsql/repmgr/
    
  7. 編修 repmgr 設定檔:
    #vim /var/lib/pgsql/repmgr/repmgr.conf
    cluster=db_cluster
    node=1
    node_name=pgs1
    conninfo='host=pgs1 user=repmgr dbname=repmgr'
    pg_bindir=/usr/pgsql-9.4/bin/
    master_response_timeout=5
    reconnect_attempts=2
    reconnect_interval=2
    failover=manual
    promote_command='/usr/pgsql-9.4/bin/repmgr standby promote -f /var/lib/pgsql/repmgr/repmgr.conf'
    follow_command='/usr/pgsql-9.4/bin/repmgr standby follow -f /var/lib/pgsql/repmgr/repmgr.conf'
    
  8. 開啟防火牆:
    #firewall-cmd --permanent --add-service=postgresql
    #firewall-cmd --reload
    
  9. 啟動 PostgreSQL Server:
    #systemctl enable postgresql-9.4
    #systemctl start postgresql-9.4
    
  10. 建立 Replication 和 rempgr 的使用者,以及 rempgr 資料庫:
    #su - postgres
    $ psql
    postgres=# CREATE ROLE pgpool SUPERUSER CREATEDB CREATEROLE INHERIT REPLICATION LOGIN ENCRYPTED PASSWORD 'secret';
    postgres=# CREATE USER repmgr SUPERUSER LOGIN ENCRYPTED PASSWORD 'secret';
    postgres=# CREATE DATABASE repmgr OWNER repmgr;
    postgres=# \q
    
  11. 將 pgs1 Server 註冊成 rempgr 的 master node:
    #su - postgres
    $ /usr/pgsql-9.4/bin/repmgr -f /var/lib/pgsql/repmgr/repmgr.conf master register
    

(三)在 Standby 上安裝設定 PostgreSQL Server:
※Standby Server 為本例的 pgs2 Server!
  1. 在 Standby Server 上安裝 PostgreSQL Server:
    #yum -y install postgresql94 postgresql94-server postgresql94-contrib rsync
    
  2. 安裝 repmgr 套件:
    #yum -y install http://yum.postgresql.org/9.4/redhat/rhel-7-x86_64/repmgr94-3.1.2-1.rhel7.x86_64.rpm
    
  3. 所有設定檔,可由同步 Master Server 取得:
    #su - postgres
    $/usr/pgsql-9.4/bin/repmgr -D /var/lib/pgsql/9.4/data -d repmgr -p 5432 -U repmgr -R postgres standby clone pgs1
    
  4. 建立 repmgr 專用目錄:
    #su - postgres
    $ mkdir -p /var/lib/pgsql/repmgr/
    
  5. 編修 repmgr 設定檔:
    #vim /var/lib/pgsql/repmgr/repmgr.conf
    cluster=db_cluster
    node=2
    node_name=pgs2
    conninfo='host=pgs2 user=repmgr dbname=repmgr'
    pg_bindir=/usr/pgsql-9.4/bin/
    master_response_timeout=5
    reconnect_attempts=2
    reconnect_interval=2
    failover=manual
    promote_command='/usr/pgsql-9.4/bin/repmgr standby promote -f /var/lib/pgsql/repmgr/repmgr.conf'
    follow_command='/usr/pgsql-9.4/bin/repmgr standby follow -f /var/lib/pgsql/repmgr/repmgr.conf'
    
  6. 開啟防火牆:
    #firewall-cmd --permanent --add-service=postgresql
    #firewall-cmd --reload
    
  7. 啟動 PostgreSQL Server:
    #systemctl enable postgresql-9.4
    #systemctl start postgresql-9.4
    
  8. 將 pgs2 Server 註冊成 rempgr 的 standby node:
    #su - postgres
    $ /usr/pgsql-9.4/bin/repmgr -f /var/lib/pgsql/repmgr/repmgr.conf standby register
    

(四)測試 PostgreSQL Server 的 Replication 功能:
  1. 在 Standby Server 上查詢 rempgr 的情況:
    #su - postgres
    $/usr/pgsql-9.4/bin/repmgr -f /var/lib/pgsql/repmgr/repmgr.conf cluster show
    
    (顯示狀況如下:)
    Role      | Name | Upstream | Connection String
    ----------+------|----------|------------------------------------
    * master  | pgs1 |          | host=pgs1 user=repmgr dbname=repmgr
      standby | pgs2 | pgs1     | host=pgs2 user=repmgr dbname=repmgr
    
  2. 在 Standby Server 上查詢 PostgreSQL Database 的情況:
    $psql -U postgres -c "\list"
    
    (顯示狀況如下:)
                                      List of databases
       Name    |  Owner   | Encoding |   Collate   |    Ctype    |   Access privileges   
    -----------+----------+----------+-------------+-------------+-----------------------
     postgres  | postgres | UTF8     | en_US.UTF-8 | en_US.UTF-8 | 
     repmgr    | repmgr   | UTF8     | en_US.UTF-8 | en_US.UTF-8 | 
     template0 | postgres | UTF8     | en_US.UTF-8 | en_US.UTF-8 | =c/postgres          +
               |          |          |             |             | postgres=CTc/postgres
     template1 | postgres | UTF8     | en_US.UTF-8 | en_US.UTF-8 | =c/postgres          +
               |          |          |             |             | postgres=CTc/postgres
    (4 rows)
    
  3. 在 Master Server 上建立一個測試用資料庫:
    #su - postgres
    $psql -U postgres -c "CREATE DATABASE test"
    
  4. 在 Standby Server 上,再次查詢 PostgreSQL Database 的情況:
    $psql -U postgres -c "\list"
                                      List of databases
       Name    |  Owner   | Encoding |   Collate   |    Ctype    |   Access privileges   
    -----------+----------+----------+-------------+-------------+-----------------------
     postgres  | postgres | UTF8     | en_US.UTF-8 | en_US.UTF-8 | 
     repmgr    | repmgr   | UTF8     | en_US.UTF-8 | en_US.UTF-8 | 
     template0 | postgres | UTF8     | en_US.UTF-8 | en_US.UTF-8 | =c/postgres          +
               |          |          |             |             | postgres=CTc/postgres
     template1 | postgres | UTF8     | en_US.UTF-8 | en_US.UTF-8 | =c/postgres          +
               |          |          |             |             | postgres=CTc/postgres
     test      | postgres | UTF8     | en_US.UTF-8 | en_US.UTF-8 | 
    (5 rows)
    
    ※可以發現有新資料庫已經被複製過來了~~~
  5. 在 Standby Server 上,新增測試 database:
    $psql -U postgres -c "CREATE DATABASE test2"
    (顯示以下訊息:)
    ERROR:  cannot execute CREATE DATABASE in a read-only transaction
    

(五)設定PgPool Server 功能:
  1. 在 PgPool Server上安裝需要套件:
    #yum install postgresql94 pgpool-II-94
    
  2. 從範例檔複製設定檔:
    #cp /etc/pgpool-II-94/pgpool.conf.sample-stream /etc/pgpool-II-94/pgpool.conf
    
  3. 編輯設定檔:
    #vim /etc/pgpool-II-94/pgpool.conf
    (只要新增或是編修下列設定參數即可:)
    listen_addresses = '*'
    port = 5432
    backend_hostname0 = 'pgs1'
    backend_port0 = 5432
    backend_weight0 = 1
    backend_data_directory0 = '/var/lib/pgsql/9.4/data'
    backend_flag0 = 'ALLOW_TO_FAILOVER'
    backend_hostname1 = 'pgs2'
    backend_port1 = 5432
    backend_weight1 = 1
    backend_data_directory1 = '/var/lib/pgsql/9.4/data'
    backend_flag1 = 'ALLOW_TO_FAILOVER'
    enable_pool_hba = on
    pid_file_name = '/var/run/pgpool-II-94/pgpool.pid'
    sr_check_user = 'pgpool'
    sr_check_password = 'secret'
    health_check_period = 10
    health_check_user = 'pgpool'
    health_check_password = 'secret'
    failover_command = '/etc/pgpool-II-94/failover.sh %d %H'  
    recovery_user = 'pgpool'
    recovery_password = 'secret'
    recovery_1st_stage_command = 'basebackup.sh'
    
  4. 編輯 failover.sh shell scripts 檔案:
    #vim /etc/pgpool-II-94/failover.sh
    #!/bin/sh
    failed_node=$1
    new_master=$2
    (
    date
    echo "Failed node: $failed_node"
    set -x
    /usr/bin/ssh -T -l postgres $new_master "/usr/pgsql-9.4/bin/repmgr -f /var/lib/pgsql/repmgr/repmgr.conf standby promote 2>/dev/null 1>/dev/null <&-"
    exit 0;
    ) 2>&1 | tee -a /tmp/pgpool_failover.log
    
  5. 修改 failover.sh 檔案權限:
    #chmod 755 /etc/pgpool-II-94/failover.sh
    
  6. 編輯 pool_hba.conf 檔案:
    #vim /etc/pgpool-II-94/pool_hba.conf
    # TYPE  DATABASE    USER        CIDR-ADDRESS          METHOD
    local   all         all                               trust
    host    all         all         127.0.0.1/32          trust
    host    all         all         ::1/128               trust
    host    all         all         0.0.0.0/0             md5
    
  7. 編輯 pool_passwd 檔案:
    #touch /etc/pgpool-II-94/pool_passwd
    #chown postgres:postgres /etc/pgpool-II-94/pool_passwd
    #su - postgres
    $pg_md5 -m -u pgpool secret
    
    ※可設定所有需要連結 pgpool 資料庫的使用者密帳!
  8. 利用 PCP 來連結管理 pgpool 功能:
    #echo "pgpool:$(pg_md5 secret)"| tee /etc/pgpool-II-94/pcp.conf
    
  9. 開啟防火牆:
    #firewall-cmd --permanent --add-service=postgresql
    #firewall-cmd --reload
    
  10. 啟動 PgPool Server:
    #systemctl enable pgpool-II-94
    #systemctl start pgpool-II-94
    

  11. (六)失效測試:

參考文獻:

  1. http://blog.pulipuli.info/2015/06/postgresqlpgpool2-ha-structure-of.html
  2. http://www.pgpool.net/docs/latest/pgpool-en.html
  3. http://www.pgpool.net/docs/latest/pgpool-zh_cn.html
  4. http://jensd.be/591/linux/setup-a-redundant-postgresql-database-with-repmgr-and-pgpool
  5. https://www.keyup.eu/en/blog/89-replication-and-load-balancing-with-postgresql-and-pgpool2
  6. http://yum.postgresql.org/repopackages.php
  7. http://dz.sdut.edu.cn/blog/subaochen/2013/08/%E5%85%B3%E4%BA%8Epgpool-ii%E7%9A%84online-recovery/
  8. http://www.ahlinux.com/postgresql/9419.html
  9. http://linux.xvx.cz/2014/10/loadbalancing-of-postgresql-databases.html
  10. https://github.com/2ndQuadrant/repmgr/blob/master/README.md

2016年3月勞動部產學合作班(分組名單)

學員分組名單:

  1.    No.07   No.19    No.24
         在 CentOS7/RHEL7上安裝管理 RAID 5 檔案系統
  2.    No.02   No.03    No.04
         在 CentOS7/RHEL7 上架設 MRTG 主機網路流量監控系統
  3.    No.11   No.15    No.16
  4.      在 CentOS7/RHEL7 上架設 PXE 系統 (DiskLess System)
  5.    No.01   No.06    No.08
  6.      在 CentOS7/RHEL7 上安裝設定 Power DNS (Master-Slave With MySQL)
  7.    No.18   No.22    No.26
  8.      SNMP 網路管理協定實作統計 ( CACTI )
  9.    No.10   No.14    No.28
  10.      在 CentOS7/RHEL7 上設定 iSCSI (Target & Initiator)
  11.    No.23   No.25    No.29
  12.      在 CentOS7/RHEL7 上架設多部 PostgreSQL (Master-Slave Pgpool-II)
  13.    No.5     No.17    No.27
  14.      在 CentOS7/RHEL7 上架設 OpenVPN Server (Quick VPN)
  15.    No.9     No.20    No.21
  16.      在 CentOS7/RHEL7 上架設 HTTP 負載平衡系統 (Reverse-Proxy)
  17.    No.12   No.13    No.30
  18.      在 CentOS7/RHEL7 上安裝設定 E-mail Server (With MySQL)
專題製作要項:
  • 主題名稱
  • 基本原理說明
  • 系統架構與環境說明
  • 操作流程與步驟
  • 測試與結果
  • 結論

在 CentOS7/RHEL7 上架設 PostgreSQL Replication (Master-Slave)

設定目標:
  • 架設多部 PostgreSQL Server,並且設定 Replication 進行同步資料與備援!
    • 請參考這一篇的設定,架設好多部 PostgreSQL Server!
Master 端快速設定流程:
  1. 切換成 postgres 使用者:
    #su - postgres
    
  2. 建立用於 replication 的使用者帳密:
    $createuser --replication -P replica 
    
  3. 修改 PostgreSQL Server 相關設定:
    $vim /var/lib/pgsql/data/postgresql.conf
    (只修改下列設定:)
    listen_addresses = '*'
    wal_level = hot_standby
    
    ### 修改同步方式 ####
    # on ⇒ sync
    # remote_write ⇒ memory sync
    # local ⇒ slave is asynchronous
    # off ⇒ asynchronous
    synchronous_commit = local
    
    archive_mode = on
    archive_command = 'cp %p /var/lib/pgsql/archive/%f'
    
    ### 設定 Master 以及 Slave 主機數量 ###
    max_wal_senders = 2
    wal_keep_segments = 10
    
    ### 同步的主機名稱(可以任意定) ###
    synchronous_standby_names = 'slave01'
    
  4. 設定 pg_hba.conf 檔:
    $vim /var/lib/pgsql/data/pg_hba.conf
    ### 在檔尾追加下列設定 ###
    # host replication [replication user] [allowed IP addresses] password
    host    replication     replica          127.0.0.1/32            password
    host    replication     replica          192.168.5.244/32            password
    host    replication     replica          192.168.5.243/32            password
    
  5. 重新啟動 PostgreSQL Server:
    $pg_ctl restart 
    
Slave 端快速設定流程:
  1. 切換成 postgres 使用者:
    #su - postgres
    
  2. 由 Master 備份資料到 Slave (需要 replica 的密碼):
    $pg_basebackup -h 192.168.5.244 -U replica -D /var/lib/pgsql/data -P --xlog 
    
  3. 修改 PostgreSQL Server 相關設定:
    $vim /var/lib/pgsql/data/postgresql.conf
    (只修改下列設定,其餘設定保留)
    hot_standby = on
    
  4. 從範例檔複製設定檔:
    $cp /usr/share/pgsql/recovery.conf.sample /var/lib/pgsql/data/recovery.conf 
    
  5. 編修設定檔 /var/lib/pgsql/data/recovery.conf:
    $ vi /var/lib/pgsql/data/recovery.conf
    (只修改下列設定,其餘設定保留)
    restore_command = 'scp 192.168.5.244:/var/lib/pgsql/archive/%f %p'
    standby_mode = on
    ### 設定 Master Server 相關設定 ###
    primary_conninfo = 'host=192.168.5.244 port=5432 user=replica password=a123456 application_name=slave01'
    
  6. 重新啟動 PostgreSQL Server:
    $pg_ctl stop
    $pg_ctl start
    

參考文獻:

  1. http://www.server-world.info/en/note?os=CentOS_7&p=postgresql&f=3

在 CentOS7/RHEL7 上使用 phpPgAdmin

設定目標:
  • 利用 phpPgAdmin 管理 PostgreSQL Server!
    • 請參考這一篇的設定,架設好 PostgreSQL Server!
    • 請參考這一篇的設定,架設好 Web + PHP Server!
快速設定流程:
  1. 調整 SELinux 設定值:
    #setsebool -P httpd_can_network_connect_db 1
    
  2. 調整 PostgreSQL Server 設定值:
    #vim /var/lib/pgsql/data/postgresql.conf
    listen_addresses = '*'
    port = 5432
    
  3. 重新啟動 PostgreSQL Server:
    #systemctl restart postgresql
    
  4. 安裝 phpPgAdmin:
    #yum install phpPgAdmin php-pgsql
    
  5. 編修 Web Server 設定檔:
    #vim /etc/httpd/conf.d/phpPgAdmin.conf
    [...省略...]
    Alias /phpPgAdmin /usr/share/phpPgAdmin
    <Location /phpPgAdmin>
        <IfModule mod_authz_core.c>
            # Apache 2.4
            Require all granted
            #Require host example.com
        </IfModule>
        [...省略...]
    </Location>
    [...省略...]
    
  6. 重新啟動 Web Server:
    #systemctl restart httpd
    
  7. 編修 phpPgAdmin 設定檔:
    #vim /etc/phpPgAdmin/config.inc.php
    (只編修下列設定檔內容,其餘保留不動作!)
    $conf['servers'][0]['host'] = 'localhost';
    $conf['extra_login_security'] = false;
    $conf['owned_only'] = true;
    
  8. 連線至 phpPgAdmin :
    #firefox http://localhost/phpPgAdmin
    

參考文獻:

  1. http://www.unixmen.com/postgresql-9-4-released-install-centos-7/
  2. http://www.server-world.info/en/note?os=CentOS_7&p=postgresql&f=1
  3. http://www.server-world.info/en/note?os=CentOS_7&p=postgresql&f=2